Updated 2012/03/05: I have found a better way to solve this problem without method swizzling. Please take a look at my post titled Subclassing Those Hard-to-Reach Classes as well as my ExampleNavBarBackground project which uses this new technique.
Updated 2011/10/18: As of iOS 5, Apple has officially added support for setting background images in UINavigationBars. To do this, all you need to do is execute the setBackgroundImage:forBarMetrics: method of UINavigationBar.
UINavigationBar *navBar = [[self navigationController] navigationBar];
UIImage *backgroundImage = [UIImage imageNamed:@"nav-bar-background-normal"];
[navBar setBackgroundImage:backgroundImage forBarMetrics:UIBarMetricsDefault];
However, if you want to support both iOS 4 and iOS 5, you will need to conditionally call the code above on iOS 5 and the code I describe below in iOS 4. This is easy to do, and my sample project has been updated to work on both versions of iOS.
Toward the end of the development phase for the first release of Epicure, Adam Betts started sending me stellar design mockups. Many of his ideas were quite easy to implement. However, something as simple as adding a background image to a UINavigationBar was much harder than it should have been. You'd hope that as a class integral to iPhone UI development, UINavigationBar would have a setBackgroundImage: method. Unfortunately, it does not (at least not as of iPhone OS 3.1).
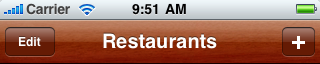
In the rest of this post, I will describe how, with a little cleverness, we can in fact configure our UINavigationBar to have any background image we desire. And to whet your appetite a little, this is how the final product will look:
Before we dive into the code, it is important to understand the techniques we will be using. When augmenting core Cocoa classes, there are a few different ways one can approach the situation. First (and most simple) is subclassing. It would be great if we could subclass UINavigationBar and then just configure our UINavigationController to use our custom image. Unfortunately, the navigationBar property of UINavigationController is read-only and there is no way to set it during initialization.
Another way we can modify core Cocoa classes is to use Objective-C categories. These allow us to quickly add new methods to existing classes. By using a category, we could easily add our own setBackgroundImage: method and call it whenever we create a UINavigationBar or UINavigationController. This method would just add a UIImageView) as a subview to the navigation bar and then send that subview to the back of its superview.
However, if you try this you will quickly see that it only kind of works. The UIImageView is definitely visible and even initially at the correct z-index. However, once you push or pop a view controller onto the navigation controller's stack, you will see that the background image is no longer in the background. Instead, it blocks out the title and navigation bar buttons. This is definitely not what we want.
What we do want is a way to ensure that no matter what happens, the UIImageView we add is always in the background. To do this, we can inject our own code into the sendSubviewToBack: and insertSubview:atIndex: methods of UIView. And in order to do this, we can use a technique called method swizzling.
At its heart, method swizzling allows us to target particular methods of existing classes and then override or augment them. There are many existing implementations for swizzling out there, so I would definitely recommend reading about them on the CocoaDev wiki. In the code that follows, I will use a very simple implementation that will work just fine in our situation.
So let's jump into the code. First, we create a single class called SCAppUtils with a single method:
#import <UIKit/UIKit.h>

#define kSCNavBarImageTag 6183746
#define kSCNavBarColor [UIColor colorWithRed:0.54 green:0.18 blue:0.03 alpha:1.0]

@interface SCAppUtils : NSObject
{
}

+ (void)customizeNavigationController:(UINavigationController *)navController;

@end#import "SCAppUtils.h"
@implementation SCAppUtils
+ (void)customizeNavigationController:(UINavigationController *)navController
{
UINavigationBar *navBar = [navController navigationBar];
[navBar setTintColor:kSCNavBarColor];
if ([navBar respondsToSelector:@selector(setBackgroundImage:forBarMetrics:)])
{
[navBar setBackgroundImage:[UIImage imageNamed:@"navigation-bar-bg.png"] forBarMetrics:UIBarMetricsDefault];
}
else
{
UIImageView *imageView = (UIImageView *)[navBar viewWithTag:kSCNavBarImageTag];
if (imageView == nil)
{
imageView = [[UIImageView alloc] initWithImage:
[UIImage imageNamed:@"navigation-bar-bg.png"]];
[imageView setTag:kSCNavBarImageTag];
[navBar insertSubview:imageView atIndex:0];
[imageView release];
}
}
}
@endNotice how we set the tint color to something that makes sense for our image. Then, we add our background image (only if it isn't already there) and ensure it has a z-index of 0 and a tag that no one else is likely using. This tag will be how we access the image view later. Also notice how we don't even need to use a category to do this. UINavigationBar is a subclass of UIView, so we can just add the background view directly.
The reason we create a utility method instead of overriding a core UINavigationBar method like drawRect: is because we really do not want to override every navigation bar in our app. We want to selectively determine which ones have the new background image. Otherwise, you get into nasty situations where the navigation bar of your UIImagePickerController also has your custom background image. iPhone apps have been rejected for less.
Next, we need to use a category combined with swizzling to augment UINavigationBar's sendSubviewToBack: and insertSubview:atIndex:.
#import <UIKit/UIKit.h>

@interface UINavigationBar (SCBackgroundImage)

- (void)scInsertSubview:(UIView *)view atIndex:(NSInteger)index;
- (void)scSendSubviewToBack:(UIView *)view;

@end#import "UINavigationBar+SCBackgroundImage.h"
#import "SCAppUtils.h"
@implementation UINavigationBar (SCBackgroundImage)
- (void)scInsertSubview:(UIView *)view atIndex:(NSInteger)index
{
[self scInsertSubview:view atIndex:index];
UIView *backgroundImageView = [self viewWithTag:kSCNavBarImageTag];
if (backgroundImageView != nil)
{
[self scSendSubviewToBack:backgroundImageView];
}
}
- (void)scSendSubviewToBack:(UIView *)view
{
[self scSendSubviewToBack:view];
UIView *backgroundImageView = [self viewWithTag:kSCNavBarImageTag];
if (backgroundImageView != nil)
{
[self scSendSubviewToBack:backgroundImageView];
}
}
@endThis code is a little confusing, and most developers unfamiliar with swizzling will immediately point at it and declare "infinite loop"! However, with the way that swizzling works, we will swap the pointers to the original methods with our 'sc' counterparts. Thus, the methods you see above will actually become the real implementations for the sendSubviewToBack: and insertSubview:atIndex: selectors, and calling scInsertSubview:index: or scSendSubviewToBack: directly will actually invoke the original methods defined by Apple. So to say it one more time a slightly different way, if you call [myNavBar sendSubviewToBack:otherView], you will actually be calling my method above, which will then call [myNavBar scSendSubviewToBack:otherView], which is now Apple's implementation of the method.
Phew.
But let's not get ahead of ourselves. Until we actually perform the swizzling, none of the magical stuff I just described will happen. So let's define a utility method for swizzling:
#import <Foundation/Foundation.h>

@interface SCClassUtils : NSObject
{
}

+ (void)swizzleSelector:(SEL)orig ofClass:(Class)c withSelector:(SEL)new;

@end#import "SCClassUtils.h"
#if OBJC_API_VERSION >= 2
#import <objc/runtime.h>
#else
#import <objc/objc-class.h>
#endif
@implementation SCClassUtils
+ (void)swizzleSelector:(SEL)orig ofClass:(Class)c withSelector:(SEL)new;
{
Method origMethod = class_getInstanceMethod(c, orig);
Method newMethod = class_getInstanceMethod(c, new);
if (class_addMethod(c, orig, method_getImplementation(newMethod),
method_getTypeEncoding(newMethod)))
{
class_replaceMethod(c, new, method_getImplementation(origMethod),
method_getTypeEncoding(origMethod));
}
else
{
method_exchangeImplementations(origMethod, newMethod);
}
}
@endThis code is beyond the scope of this post. If you would like to understand how it works, I again refer you to this page on method swizzling.
Finally, we need to call our swizzleSelector:ofClass:withSelector: method to actually perform the swizzling. We can do this by adding some code to our main.m file:
#import <UIKit/UIKit.h>
#import "SCClassUtils.h"

int main(int argc, char *argv[])
{
    [SCClassUtils swizzleSelector:@selector(insertSubview:atIndex:)
                          ofClass:[UINavigationBar class]
                     withSelector:@selector(scInsertSubview:atIndex:)];
    [SCClassUtils swizzleSelector:@selector(sendSubviewToBack:)
                          ofClass:[UINavigationBar class]
                     withSelector:@selector(scSendSubviewToBack:)];

    NSAutoreleasePool *pool = [[NSAutoreleasePool alloc] init];
    int retVal = UIApplicationMain(argc, argv, nil, nil);
    [pool release];
    return retVal;
}
And there you have it! That should be all you need to do to add a custom background image to your UINavigationBars. Just make sure that you call [SCAppUtils customizeNavigationController:myNavController] whenever you create a UINavigationController object. What this exercise originally helped me realize is that Objective-C is an incredibly powerful language; even if Apple does not give you the hooks you need, you can most likely do anything you want by being resourceful.
You can see all of this code in action by downloading this sample project on GitHub.