In recent years, Apple has been expending more and more effort allowing developers to easily create rich user interfaces using Xcode and Interface Builder. In iOS 5, Apple added Storyboards, giving developers the power to link their various screens together as well as define sets of view controllers in the same file. Some features in iOS (including static table views and state preservation and restoration) are significantly easier to implement using Storyboards.
In iOS 6, Apple added support for Auto Layout, a system for defining the layout of your views using a series of mathematical constraints. While it is possible to make use of Auto Layout completely from source code, there are many ways in which Interface Builder makes this task much easier. Xcode can automatically create constraints for you, as well as show you both missing and invalid constraints.
Since then, Apple has continued to significantly improve Xcode and Interface Builder. Auto Layout is now even easier to use in Xcode 5. And in Xcode 6 Apple has gone above and beyond by adding support for multiple size classes and live custom view rendering. It is obvious to me that Apple really wants you to use Interface Builder as much as possible.
That being said, I have had a difficult time fully embracing XIBs and Storyboards despite all of their glory. I have always known that I should probably be using them, but I kept running into certain situations that would cause me to go back to my trusty old source code. However, Xcode 6 has made enough advances that I have decided to give them another shot.
One of the first things I tried to do was to create a small, custom UIView subclass whose subviews and layout were defined in a XIB file. This should be easy, right? I quickly discovered that it was not at all intuitive. Let’s walk through the process of how we might do this.
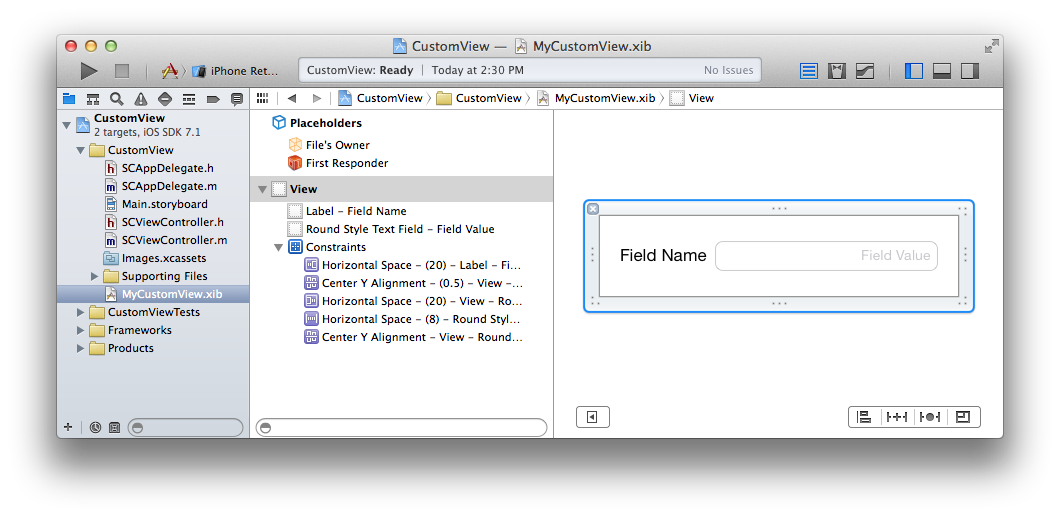
First, let’s create a new Xcode project using the Single View Application template. Now, let’s create a new file. Select View from the iOS User Interface section and name your new view MyCustomView. It doesn’t really matter what we put in here. Let’s make it simple and add a label and a text field as follows:
Now let’s add a new Objective-C class file. Name it SCCustomView and make it subclass UIView. The first thing we should do is add the IBOutlet properties to the class header file.
#import <UIKit/UIKit.h>

@interface SCCustomView : UIView

@property (nonatomic, strong) IBOutlet UILabel *label;
@property (nonatomic, strong) IBOutlet UITextField *textField;

@end
Set the File’s Owner of MyCustomView.xib to SCCustomView. Then, connect the label and text field outlets as you would for a view controller. Now, we have to worry about two ways that we might want to instantiate an instance of SCCustomView:
- In code using
[[SCCustomView alloc] initWithFrame:CGRectZero] - From another XIB file by adding a
UIViewobject and then setting its class to SCCustomView. This will call-initWithCoder:on our view subclass.
Given this, we now need to write some code to load the XIB whenever an SCCustomView is instantiated. We can do this in SCCustomView.m.
#import "SCCustomView.h"

@interface SCCustomView ()
@property (nonatomic, strong) UIView *containerView;
@property (nonatomic, strong) NSMutableArray *customConstraints;
@end


@implementation SCCustomView

- (instancetype)initWithCoder:(NSCoder *)aDecoder
{
    self = [super initWithCoder:aDecoder];
    if (self) {
        [self commonInit];
    }
    return self;
}

- (instancetype)initWithFrame:(CGRect)frame
{
    self = [super initWithFrame:frame];
    if (self) {
        [self commonInit];
    }
    return self;
}

- (void)commonInit
{
    _customConstraints = [[NSMutableArray alloc] init];

    UIView *view = nil;
    NSArray *objects = [[NSBundle mainBundle] loadNibNamed:@"MyCustomView"
                                                     owner:self
                                                   options:nil];
    for (id object in objects) {
        if ([object isKindOfClass:[UIView class]]) {
            view = object;
            break;
        }
    }

    if (view != nil) {
        _containerView = view;
        view.translatesAutoresizingMaskIntoConstraints = NO;
        [self addSubview:view];
        [self setNeedsUpdateConstraints];
    }
}

- (void)updateConstraints
{
    [self removeConstraints:self.customConstraints];
    [self.customConstraints removeAllObjects];

    if (self.containerView != nil) {
        UIView *view = self.containerView;
        NSDictionary *views = NSDictionaryOfVariableBindings(view);

        [self.customConstraints addObjectsFromArray:
            [NSLayoutConstraint constraintsWithVisualFormat:
                @"H:|[view]|" options:0 metrics:nil views:views]];
        [self.customConstraints addObjectsFromArray:
            [NSLayoutConstraint constraintsWithVisualFormat:
                @"V:|[view]|" options:0 metrics:nil views:views]];

        [self addConstraints:self.customConstraints];
    }

    [super updateConstraints];
}

@end
Let’s step through this code a little. First, note that we are overriding both -initWithFrame: and well as -initWithCoder:. This is very important to enable us to instantiate this view both from code as well as from a Storyboard or XIB. Then, we run some common initialization code that loads the top-level objects from our XIB file. We iterate over this array to find our view. The rest of the code in this class simply adds the view to our hierarchy and creates some constraints to ensure that this view fills our custom view class.
It’s a tad convoluted, but it makes sense and is the best way we currently have for creating a custom view subclass that is backed by a XIB file. If you were going to create multiple UIView subclasses this way in the same application, the above code could be shared in a common superclass.
If you would like to see Xcode support this and handle the heavy-lifting behind the scenes, feel free to duplicate radar 17292752 at the Apple Bug Reporter.